CRM Marketing Best Practices 2025: Strategies to Thrive in the Evolving Landscape
CRM Marketing Best Practices 2025: Navigating the Future of Customer Relationships
The world of Customer Relationship Management (CRM) marketing is in constant flux. What worked yesterday might not work tomorrow, and staying ahead of the curve is crucial for sustained success. As we approach 2025, the landscape is poised for significant shifts, driven by technological advancements, evolving customer expectations, and a growing emphasis on personalization. This comprehensive guide delves into the CRM marketing best practices you need to adopt to not only survive but thrive in the dynamic environment of 2025.
Understanding the Core of CRM Marketing
Before we dive into the specifics, let’s revisit the fundamental principles of CRM marketing. At its heart, CRM marketing is about building and nurturing relationships with your customers. It’s about understanding their needs, preferences, and behaviors to deliver relevant and valuable experiences. This involves leveraging data, technology, and strategic planning to:
- Acquire New Customers: Attract and convert potential customers through targeted campaigns.
- Retain Existing Customers: Foster loyalty and reduce churn by providing exceptional service and personalized experiences.
- Increase Customer Lifetime Value (CLTV): Maximize the profitability of each customer relationship through upselling, cross-selling, and repeat purchases.
Effective CRM marketing is not just about using software; it’s a customer-centric approach that permeates every aspect of your business.
Key Trends Shaping CRM Marketing in 2025
Several key trends are fundamentally reshaping CRM marketing. Understanding these trends is paramount to developing a forward-thinking strategy:
1. Artificial Intelligence (AI) and Machine Learning (ML) Integration
AI and ML are no longer futuristic concepts; they are integral to modern CRM. In 2025, expect to see even greater integration of these technologies, enabling:
- Hyper-Personalization: AI algorithms will analyze vast datasets to understand individual customer preferences and deliver highly personalized content, product recommendations, and offers.
- Predictive Analytics: ML models will predict customer behavior, such as churn risk and purchase likelihood, allowing for proactive interventions.
- Automated Marketing Workflows: AI-powered automation will handle routine tasks, such as email marketing, lead scoring, and customer service, freeing up marketers to focus on strategic initiatives.
- Chatbots and Virtual Assistants: AI-powered chatbots will provide instant customer support, answer queries, and guide customers through the sales process.
2. Data Privacy and Security
With increasing data privacy regulations like GDPR and CCPA, data security will be a top priority. In 2025, CRM marketing strategies will need to incorporate robust data privacy measures, including:
- Transparency and Consent: Clearly communicating how customer data is collected, used, and protected, and obtaining explicit consent.
- Data Minimization: Collecting only the data necessary for specific purposes.
- Data Encryption and Security Protocols: Implementing strong security measures to protect customer data from breaches.
- Compliance with Regulations: Adhering to all relevant data privacy laws and regulations.
3. The Rise of Omnichannel Experiences
Customers interact with businesses across multiple channels – website, email, social media, mobile apps, and more. In 2025, the focus will be on delivering seamless and consistent experiences across all these channels. This requires:
- Integrated CRM Systems: Connecting all customer touchpoints to a central CRM platform to create a unified view of the customer.
- Personalized Communication: Tailoring messages and offers to each customer based on their channel preferences and past interactions.
- Consistent Branding: Maintaining a consistent brand identity across all channels.
- Seamless Transitions: Allowing customers to seamlessly switch between channels without losing context.
4. Focus on Customer Experience (CX)
Customer experience will continue to be a key differentiator. Businesses that prioritize CX will gain a significant competitive advantage. This involves:
- Understanding Customer Journeys: Mapping out the entire customer journey to identify pain points and opportunities for improvement.
- Proactive Customer Service: Anticipating customer needs and providing proactive support.
- Personalized Interactions: Tailoring interactions to each customer’s individual preferences and needs.
- Gathering Customer Feedback: Actively soliciting and acting on customer feedback to improve the customer experience.
5. Emphasis on Value-Driven Marketing
Customers are increasingly discerning and expect value beyond just products and services. In 2025, CRM marketing will shift towards value-driven strategies, including:
- Providing Valuable Content: Offering informative and engaging content that addresses customer needs and interests.
- Building Trust and Transparency: Being honest and transparent in all interactions.
- Supporting Social Causes: Aligning with social causes that resonate with customers.
- Creating a Sense of Community: Building a community around your brand and fostering customer engagement.
CRM Marketing Best Practices for 2025
Now, let’s delve into the specific best practices you should implement to optimize your CRM marketing efforts in 2025:
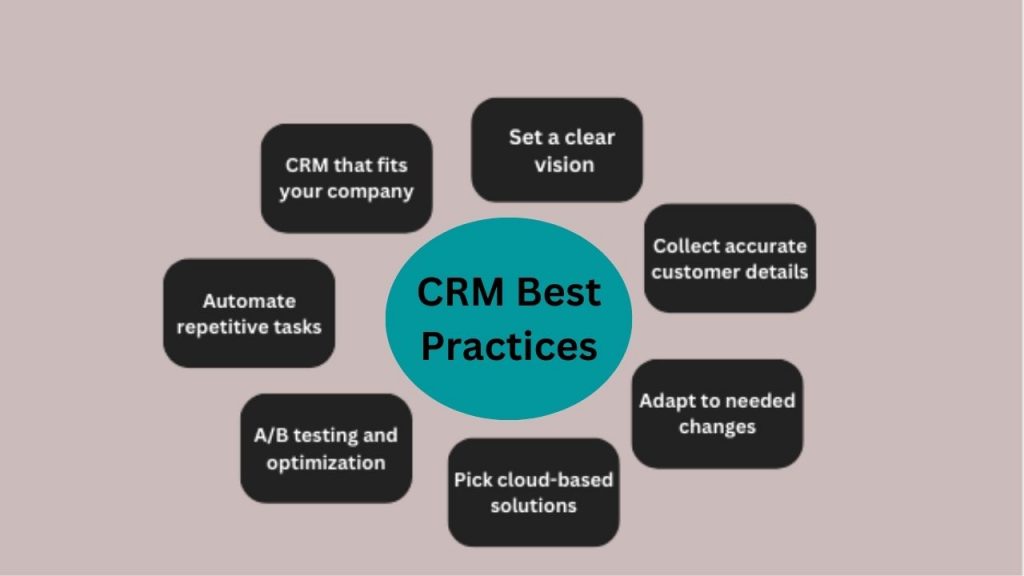
1. Select the Right CRM Platform
Choosing the right CRM platform is the foundation of your CRM marketing strategy. Consider the following factors:
- Scalability: Choose a platform that can grow with your business.
- Integration Capabilities: Ensure the platform integrates with your existing marketing and sales tools.
- User-Friendliness: Select a platform that is easy for your team to use.
- Reporting and Analytics: Look for robust reporting and analytics capabilities to track your performance.
- Mobile Accessibility: Ensure the platform is accessible on mobile devices.
- Security and Compliance: Prioritize a platform with strong security features and compliance with data privacy regulations.
2. Implement Data-Driven Personalization
Personalization is no longer optional; it’s essential. Use data to:
- Segment Your Audience: Divide your customers into distinct segments based on demographics, behavior, and preferences.
- Personalize Content: Tailor your marketing messages, product recommendations, and offers to each segment.
- Personalize the Customer Journey: Adapt the customer journey based on individual customer behavior and interactions.
- Use Dynamic Content: Display personalized content on your website and in your emails.
3. Leverage AI and Automation
Embrace AI and automation to streamline your CRM marketing efforts:
- Automate Email Marketing: Use automated email workflows to nurture leads, onboard new customers, and send targeted promotions.
- Use Chatbots for Customer Service: Implement AI-powered chatbots to provide instant customer support and answer frequently asked questions.
- Automate Lead Scoring: Use AI to score leads based on their behavior and engagement.
- Automate Social Media Management: Schedule social media posts and track your performance.
4. Prioritize Omnichannel Experiences
Create a seamless omnichannel experience for your customers:
- Integrate Your Channels: Connect your website, email, social media, and other channels to your CRM system.
- Personalize Across Channels: Tailor your messages and offers to each customer based on their channel preferences and past interactions.
- Provide Consistent Branding: Maintain a consistent brand identity across all channels.
- Enable Seamless Transitions: Allow customers to seamlessly switch between channels without losing context.
5. Focus on Customer Experience (CX)
Make customer experience a top priority:
- Map the Customer Journey: Understand the entire customer journey from start to finish.
- Identify Pain Points: Identify areas where customers may experience frustration or difficulty.
- Provide Proactive Support: Anticipate customer needs and provide proactive support.
- Gather Customer Feedback: Actively solicit and act on customer feedback to improve the customer experience.
6. Build a Strong Data Foundation
Data is the lifeblood of CRM marketing. Ensure you have a strong data foundation:
- Collect Accurate Data: Collect accurate and up-to-date customer data.
- Clean and Organize Your Data: Clean and organize your data to ensure its accuracy and reliability.
- Use Data Analytics: Use data analytics to gain insights into customer behavior and preferences.
- Protect Customer Data: Implement robust data security measures to protect customer data.
7. Foster a Customer-Centric Culture
CRM marketing is not just about technology; it’s about fostering a customer-centric culture throughout your organization:
- Empower Your Employees: Empower your employees to make decisions that benefit the customer.
- Train Your Team: Train your team on CRM best practices and customer service skills.
- Encourage Collaboration: Encourage collaboration between your marketing, sales, and customer service teams.
- Measure Customer Satisfaction: Track customer satisfaction and use it to improve your performance.
8. Embrace Agile Marketing
The marketing landscape is constantly changing. Embrace agile marketing to adapt quickly to new trends and opportunities:
- Use Short Iterations: Break down your marketing projects into short iterations.
- Test and Learn: Test your marketing campaigns and learn from the results.
- Be Flexible: Be flexible and adapt your strategy as needed.
- Continuously Improve: Continuously improve your marketing processes.
9. Prioritize Data Privacy and Security
Data privacy and security are paramount. Implement the following measures:
- Comply with Regulations: Comply with all relevant data privacy laws and regulations, such as GDPR and CCPA.
- Get Consent: Obtain explicit consent from customers before collecting their data.
- Be Transparent: Be transparent about how you collect, use, and protect customer data.
- Implement Security Measures: Implement strong security measures to protect customer data from breaches.
10. Continuously Monitor and Optimize
CRM marketing is an ongoing process. Continuously monitor your performance and optimize your strategies:
- Track Key Metrics: Track key metrics, such as customer acquisition cost, customer lifetime value, and churn rate.
- Analyze Your Results: Analyze your results to identify areas for improvement.
- Test Different Strategies: Test different strategies to see what works best.
- Stay Up-to-Date: Stay up-to-date on the latest CRM marketing trends and best practices.
The Role of Emerging Technologies
Beyond AI and ML, several other emerging technologies will play a significant role in shaping CRM marketing in 2025:
1. Augmented Reality (AR) and Virtual Reality (VR)
AR and VR can enhance customer experiences by providing immersive product demonstrations, virtual try-ons, and interactive training sessions.
2. Blockchain
Blockchain can improve data security and transparency in CRM by securely storing customer data and enabling secure transactions.
3. Internet of Things (IoT)
IoT devices can collect valuable customer data, such as usage patterns and preferences, which can be used to personalize marketing efforts and improve customer service.
4. Voice Search
With the increasing popularity of voice assistants, optimizing your content for voice search will be crucial for attracting customers.
Measuring the Success of Your CRM Marketing Efforts
Tracking the right metrics is essential to understand the effectiveness of your CRM marketing initiatives. Here are some key performance indicators (KPIs) to monitor:
- Customer Acquisition Cost (CAC): The cost of acquiring a new customer.
- Customer Lifetime Value (CLTV): The predicted revenue a customer will generate throughout their relationship with your business.
- Churn Rate: The percentage of customers who stop doing business with you.
- Conversion Rate: The percentage of leads who convert into customers.
- Customer Satisfaction (CSAT): A measure of how satisfied customers are with your products or services.
- Net Promoter Score (NPS): A measure of customer loyalty and willingness to recommend your business.
- Return on Investment (ROI): The profitability of your CRM marketing campaigns.
Regularly analyze these metrics to identify areas for improvement and optimize your CRM marketing strategies.
Overcoming Challenges in CRM Marketing
Implementing CRM marketing best practices is not without its challenges. Here are some common hurdles and how to overcome them:
1. Data Silos
Data silos occur when customer data is stored in separate systems and is not integrated. To overcome this, invest in a CRM platform that integrates with your existing systems and implement data governance policies.
2. Lack of Data Quality
Poor data quality can lead to inaccurate insights and ineffective marketing campaigns. Regularly clean and update your data, and implement data validation processes.
3. Resistance to Change
Implementing new CRM marketing strategies can be met with resistance from employees. Communicate the benefits of the changes, provide training, and involve employees in the process.
4. Budget Constraints
CRM marketing can be expensive. Prioritize your investments and focus on the most impactful strategies. Start small and scale your efforts as your budget allows.
5. Keeping up with Technology
The rapid pace of technological advancements can be overwhelming. Stay informed about the latest trends, and focus on adopting technologies that align with your business goals and customer needs.
The Future is Now: Preparing for 2025 and Beyond
CRM marketing in 2025 will be more customer-centric, data-driven, and technology-powered than ever before. To succeed, businesses must embrace the trends outlined above and implement the best practices discussed in this guide.
The companies that prioritize personalization, omnichannel experiences, data privacy, and customer experience will be best positioned to thrive. By focusing on building strong customer relationships, delivering value, and continuously optimizing their strategies, businesses can navigate the evolving landscape and achieve long-term success.
The time to prepare for 2025 is now. Start by assessing your current CRM marketing efforts, identifying areas for improvement, and developing a strategic roadmap for the future. By taking a proactive approach, you can ensure that your business is well-equipped to meet the challenges and seize the opportunities that lie ahead.
Don’t just adapt; lead the way. The future of CRM marketing is in your hands.


