Mastering the CRM Marketing Funnel: A Step-by-Step Guide to Setup and Optimization
In today’s hyper-competitive business landscape, understanding and leveraging the power of a Customer Relationship Management (CRM) system is no longer optional—it’s essential. But simply *having* a CRM isn’t enough. The real magic happens when you meticulously craft and optimize your CRM marketing funnel. This comprehensive guide will walk you through every step of setting up and refining your CRM marketing funnel, transforming leads into loyal customers and driving sustainable business growth.
What is a CRM Marketing Funnel?
Before diving into the how-to, let’s clarify what we mean by a CRM marketing funnel. Think of it as a visual representation of your customer’s journey, from initial awareness to becoming a brand advocate. It’s a structured process that guides potential customers through various stages, with the ultimate goal of converting them into paying customers and fostering long-term loyalty. Your CRM acts as the engine that powers this funnel, providing the tools and data needed to nurture leads and personalize the customer experience.
A well-designed CRM marketing funnel helps you:
- Attract qualified leads.
- Engage them with relevant content and offers.
- Convert them into customers.
- Retain them for long-term value.
Why is a CRM Marketing Funnel Important?
The benefits of a well-structured CRM marketing funnel are numerous. It provides a clear roadmap for your marketing efforts, ensuring that your resources are used efficiently and effectively. Here’s why it matters:
- Improved Lead Generation: By targeting specific customer segments with tailored content, you can attract higher-quality leads who are more likely to convert.
- Enhanced Customer Engagement: Personalization is key. A CRM funnel allows you to deliver the right message to the right person at the right time, leading to increased engagement and interest.
- Increased Conversion Rates: Nurturing leads through the funnel with relevant information and offers increases their likelihood of making a purchase.
- Higher Customer Retention: By providing excellent customer service and ongoing value, you can build strong relationships and encourage repeat business.
- Better ROI: A well-optimized funnel helps you get the most out of your marketing budget by focusing on the most promising leads and activities.
- Data-Driven Decision Making: CRM systems provide valuable data on customer behavior, allowing you to make informed decisions about your marketing strategies.
Step-by-Step Guide to Setting Up Your CRM Marketing Funnel
Now, let’s get into the practical steps of setting up your CRM marketing funnel. This process involves several key stages, each crucial for success.
1. Choose the Right CRM System
The foundation of your marketing funnel is your CRM system. Selecting the right one is critical. Consider the following factors:
- Scalability: Choose a CRM that can grow with your business.
- Features: Look for features like lead management, contact management, email marketing integration, automation capabilities, and reporting tools.
- Ease of Use: The system should be user-friendly and easy for your team to learn and adopt.
- Integrations: Ensure it integrates seamlessly with your existing marketing tools and platforms.
- Budget: Consider the pricing structure and whether it fits your budget.
Some popular CRM options include:
- Salesforce
- HubSpot
- Zoho CRM
- Microsoft Dynamics 365
- Pipedrive
Research and compare different CRM systems to find the one that best suits your specific needs and budget.
2. Define Your Target Audience
Before you start building your funnel, you need to understand who you’re trying to reach. Create detailed customer personas that represent your ideal customers. Consider factors like:
- Demographics: Age, gender, location, income, education, etc.
- Psychographics: Interests, values, lifestyle, personality traits.
- Behaviors: Online activity, purchase history, brand interactions.
- Needs and Pain Points: What problems are they trying to solve? What are their goals?
The more specific you are, the better you can tailor your marketing messages and offers to resonate with your target audience.
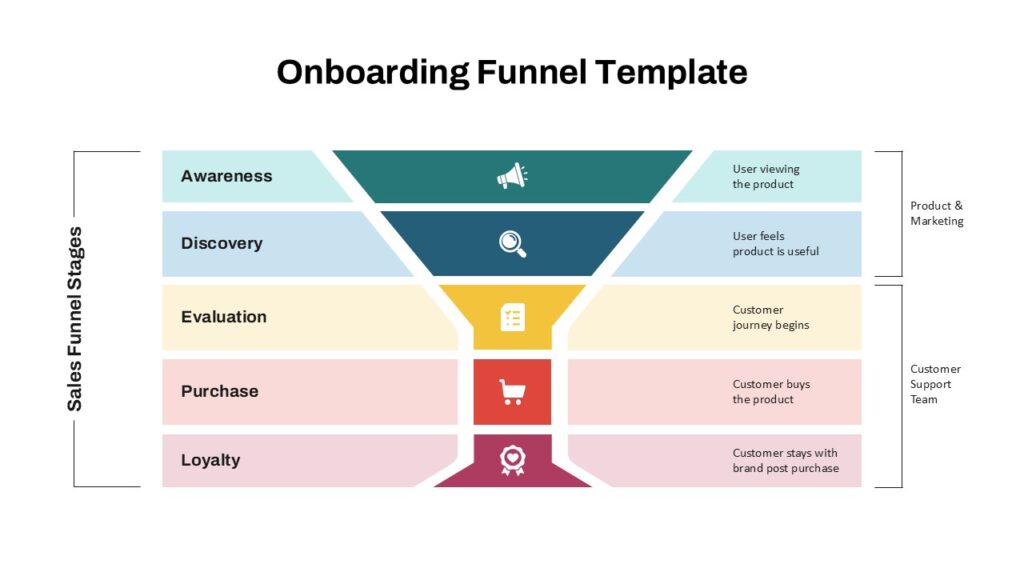
3. Map Out Your Funnel Stages
The CRM marketing funnel typically consists of several stages. While the specific stages may vary depending on your business, the core stages are generally:
- Awareness: This is the top of the funnel, where potential customers first become aware of your brand. Activities include content marketing, social media, SEO, and advertising.
- Interest: Leads show interest in your products or services. Activities include providing valuable content, offering free trials, and collecting contact information.
- Decision: Leads are considering making a purchase. Activities include providing product demos, offering consultations, and sending targeted offers.
- Action (Conversion): Leads become customers.
- Retention: Focus on keeping customers engaged and encouraging repeat business. Activities include providing excellent customer service, sending personalized communications, and offering exclusive deals.
- Advocacy: Customers become brand advocates, promoting your brand to others. Activities include encouraging reviews, testimonials, and referrals.
For each stage, define the actions you want customers to take and the content or offers you’ll provide.
4. Create Compelling Content
Content is the fuel that drives your marketing funnel. Create high-quality, valuable content that addresses your target audience’s needs and interests at each stage of the funnel.
- Awareness Stage: Blog posts, infographics, social media updates, videos, and ebooks. The goal is to educate and inform.
- Interest Stage: Case studies, webinars, white papers, and email newsletters. The goal is to provide in-depth information and establish your expertise.
- Decision Stage: Product demos, free trials, consultations, and comparison guides. The goal is to convince leads to make a purchase.
- Retention Stage: Customer support, tutorials, exclusive content, and loyalty programs. The goal is to keep customers engaged and encourage repeat business.
Make sure your content is optimized for search engines (SEO) to increase visibility and attract more leads.
5. Set Up Automated Workflows
Automation is key to streamlining your CRM marketing funnel and saving time. Use your CRM system to create automated workflows that trigger actions based on customer behavior.
Examples of automated workflows:
- Welcome Emails: Send a welcome email to new subscribers or leads.
- Lead Nurturing Emails: Send a series of emails to nurture leads through the funnel.
- Abandoned Cart Emails: Remind customers about items left in their shopping carts.
- Post-Purchase Emails: Thank customers for their purchase and provide information about their order.
- Re-engagement Emails: Reach out to inactive customers to encourage them to re-engage.
Automated workflows ensure that your marketing efforts are consistent and personalized, even when you’re not actively managing them.
6. Segment Your Audience
Don’t treat all your leads the same. Segment your audience based on demographics, behaviors, interests, and other relevant factors. This allows you to send targeted messages and offers that are more likely to resonate with each segment.
Examples of segmentation criteria:
- Demographics: Age, location, industry, job title.
- Behavior: Website activity, email engagement, purchase history.
- Interests: Content they’ve downloaded, topics they’ve shown interest in.
Segmentation enables you to personalize your marketing efforts and improve your conversion rates.
7. Integrate Your CRM with Other Tools
To maximize the effectiveness of your CRM marketing funnel, integrate your CRM with other marketing tools, such as:
- Email Marketing Platforms: Mailchimp, Constant Contact, etc.
- Social Media Management Tools: Hootsuite, Buffer, etc.
- Website Analytics: Google Analytics.
- Advertising Platforms: Google Ads, Facebook Ads.
Integrations allow you to streamline your marketing efforts, track your results more effectively, and get a complete view of your customer journey.
8. Track and Analyze Your Results
Regularly track and analyze your CRM marketing funnel’s performance to identify areas for improvement. Your CRM system should provide reporting and analytics tools that allow you to monitor key metrics, such as:
- Conversion Rates: The percentage of leads that convert into customers at each stage of the funnel.
- Click-Through Rates: The percentage of people who click on your links in emails or on your website.
- Open Rates: The percentage of people who open your emails.
- Customer Acquisition Cost (CAC): The cost of acquiring a new customer.
- Customer Lifetime Value (CLTV): The predicted revenue a customer will generate over their lifetime.
Use this data to identify what’s working and what’s not. Make adjustments to your content, offers, and workflows to optimize your funnel for better results.
9. Continuously Optimize Your Funnel
The CRM marketing funnel is not a set-it-and-forget-it project. It requires ongoing monitoring and optimization. Regularly review your results, test different approaches, and make adjustments as needed.
Here are some optimization strategies:
- A/B Testing: Test different versions of your content, subject lines, and calls to action to see what performs best.
- Refine Your Targeting: Adjust your target audience based on the data you collect.
- Improve Your Content: Create new content and update existing content to keep it fresh and relevant.
- Optimize Your Workflows: Adjust your automated workflows based on customer behavior.
By continuously optimizing your funnel, you can improve your conversion rates, increase customer retention, and drive sustainable business growth.
Advanced CRM Marketing Funnel Strategies
Once you have a basic CRM marketing funnel in place, consider these advanced strategies to further enhance your results:
Personalization at Scale
Go beyond basic personalization. Use data from your CRM to personalize every aspect of the customer experience, including:
- Dynamic Content: Display different content on your website based on a customer’s profile.
- Personalized Product Recommendations: Suggest products based on a customer’s purchase history or browsing behavior.
- Behavioral Email Marketing: Send emails triggered by specific customer actions, such as browsing a product or abandoning a cart.
Lead Scoring
Implement a lead scoring system to prioritize leads based on their likelihood of converting. Assign points to leads based on their behavior and engagement, such as website visits, email opens, and form submissions. This allows your sales team to focus their efforts on the most promising leads.
Customer Segmentation Refinement
Regularly review and refine your customer segments. As you gather more data, you can create more granular segments that allow you to tailor your marketing messages even more effectively. Consider using lookalike audiences to find new leads that share similar characteristics to your existing customers.
Cross-Selling and Upselling
Use your CRM to identify opportunities for cross-selling and upselling. Recommend related products to customers who have made a purchase, or offer upgrades to existing products or services. This can significantly increase your revenue per customer.
Implement a Loyalty Program
Reward your loyal customers with exclusive offers, discounts, and other benefits. A loyalty program can help you retain customers, increase repeat business, and encourage brand advocacy.
Marketing Automation for Sales Enablement
Use marketing automation to support your sales team. Automatically send leads to the sales team when they reach a certain stage in the funnel. Provide sales reps with relevant information about leads, such as their interests and past interactions with your brand. This helps the sales team close deals more efficiently.
Common Mistakes to Avoid
While setting up a CRM marketing funnel can be incredibly rewarding, there are some common pitfalls to avoid:
- Not Choosing the Right CRM: Selecting a CRM that doesn’t meet your needs can hinder your efforts.
- Not Defining Your Target Audience: Failing to understand your ideal customer will result in ineffective marketing.
- Creating Generic Content: Content that isn’t relevant or engaging won’t capture your audience’s attention.
- Ignoring Data and Analytics: Failing to track and analyze your results prevents you from making data-driven improvements.
- Not Automating Key Processes: Manual processes waste time and can lead to inconsistencies.
- Focusing on the Short-Term: Building a successful CRM marketing funnel is a long-term process.
By avoiding these mistakes, you can increase your chances of building a highly effective CRM marketing funnel.
Conclusion
Setting up and optimizing a CRM marketing funnel is a crucial step in driving business growth. By following the steps outlined in this guide, you can create a powerful system that attracts leads, nurtures them through the sales process, and transforms them into loyal customers. Remember to choose the right CRM, define your target audience, create compelling content, automate your workflows, and continuously analyze and optimize your funnel. With dedication and a data-driven approach, you can harness the power of your CRM to achieve your marketing goals and build a thriving business.


