Introduction: Why a Small Business CRM Demo Matters
Running a small business is a whirlwind. You’re juggling everything from product development and marketing to sales and customer service. In the midst of all this, it’s easy for customer relationships to fall by the wayside. That’s where a Customer Relationship Management (CRM) system comes in. But with so many options, how do you choose the right one? And more importantly, how do you know it will actually work for *your* business? This is where a small business CRM demo becomes invaluable.
A CRM demo isn’t just a sales pitch; it’s a chance to see the software in action. It’s an opportunity to get hands-on, ask questions, and determine if a particular CRM solution aligns with your specific needs and goals. Think of it as a test drive for your business. It allows you to explore the features, understand the user interface, and get a feel for how the CRM will integrate into your daily workflow.
This comprehensive guide will walk you through everything you need to know about small business CRM demos. We’ll cover what to look for, how to prepare, and how to make the most of the experience. We’ll also delve into the benefits of using a CRM, explore popular CRM options tailored for small businesses, and provide tips on evaluating different solutions. By the end, you’ll be well-equipped to choose the right CRM and transform your customer relationships from a chaotic mess into a well-oiled machine.
The Power of a CRM for Small Businesses
Before diving into the specifics of a CRM demo, let’s understand why a CRM is so crucial for small businesses. In today’s competitive landscape, customer experience is king. Businesses that prioritize customer satisfaction are more likely to retain customers, generate positive word-of-mouth, and ultimately thrive. A CRM system acts as the central nervous system of your customer interactions, allowing you to:
- Centralize Customer Data: Store all customer information – contact details, purchase history, communication logs, and more – in one accessible place. No more scattered spreadsheets or lost sticky notes!
- Improve Communication: Track all interactions with customers, ensuring consistent and personalized communication across all channels (email, phone, social media, etc.).
- Automate Tasks: Automate repetitive tasks like email follow-ups, appointment scheduling, and lead nurturing, freeing up your team to focus on more strategic initiatives.
- Boost Sales: Identify and nurture leads, track sales progress, and close deals more efficiently. CRM systems often include sales pipeline management tools to streamline the sales process.
- Enhance Customer Service: Provide faster and more effective customer support by having instant access to customer history and preferences.
- Gain Actionable Insights: Generate reports and analytics to understand customer behavior, track key performance indicators (KPIs), and make data-driven decisions.
In essence, a CRM empowers small businesses to build stronger customer relationships, improve efficiency, and drive revenue growth. It’s an investment that can pay dividends for years to come.
What to Expect in a Small Business CRM Demo
A well-conducted CRM demo should be more than just a product presentation. It should be an interactive experience that allows you to explore the software’s capabilities and assess its suitability for your business. Here’s what you should typically expect:
- Introduction and Overview: The demo will usually begin with a brief introduction to the CRM provider and its philosophy. You’ll get an overview of the system’s core features and functionalities.
- Feature Demonstrations: The presenter will walk you through key features, such as contact management, lead tracking, sales pipeline management, email marketing integration, and reporting.
- Scenario-Based Examples: The best demos use real-world scenarios to illustrate how the CRM can be used in your business. For example, they might show you how to create a lead, nurture it through the sales pipeline, and close a deal.
- Interactive Q&A: This is your chance to ask questions! Don’t hesitate to inquire about specific features, integrations, pricing, and anything else that’s important to you.
- Customization and Configuration: The presenter should show you how the CRM can be customized to fit your specific needs. This might include setting up custom fields, creating workflows, and integrating with other software you use.
- Real-Time Interaction (Ideally): A good demo will allow for some level of real-time interaction. Perhaps you’ll be able to navigate the interface yourself or even try out certain functions.
- Pricing and Implementation Details: The demo should conclude with a discussion of pricing plans, implementation options, and ongoing support.
Remember, the goal of the demo is to help you determine if the CRM is the right fit for your business. Don’t be afraid to ask questions and express your concerns. The more information you gather, the better equipped you’ll be to make an informed decision.
Preparing for Your Small Business CRM Demo
To get the most out of your CRM demo, it’s essential to prepare beforehand. This will help you focus on the most important aspects of the software and ensure that you get the answers you need. Here’s a checklist to guide you:
- Define Your Needs and Goals: Before the demo, take some time to identify your business’s specific CRM needs. What are your pain points? What are your goals for using a CRM? Write down a list of requirements and prioritize them.
- Research Potential CRM Providers: Do some preliminary research on different CRM providers. Read reviews, compare features, and identify a few that seem like a good fit for your business.
- Gather Your Data: Collect any data you want to use during the demo. This could include customer contact information, sales data, or examples of your current processes.
- Prepare a List of Questions: Based on your research and your business needs, create a list of questions to ask during the demo. Focus on features, integrations, pricing, and support.
- Identify Key Stakeholders: If other members of your team will be using the CRM, involve them in the demo process. This will help ensure that the chosen CRM meets everyone’s needs.
- Consider Your Integration Needs: Think about the other software you use, such as email marketing platforms, accounting software, and e-commerce platforms. Make sure the CRM integrates with these systems.
- Set Aside Dedicated Time: Don’t rush the demo. Allocate sufficient time to fully explore the software and ask all your questions.
By preparing in advance, you’ll be able to make the most of your CRM demo and determine if it’s the right solution for your small business.
Key Features to Look for in a Small Business CRM
While the specific features you need will vary depending on your business, there are several key features that are essential for any small business CRM. During the demo, pay close attention to these areas:
- Contact Management: The ability to store and manage customer contact information, including names, addresses, phone numbers, email addresses, and social media profiles. Look for features like contact segmentation, tagging, and the ability to add custom fields.
- Lead Management: Tools to track leads, capture lead information, and nurture leads through the sales pipeline. This includes features like lead scoring, lead assignment, and automated follow-up sequences.
- Sales Pipeline Management: A visual representation of your sales process, allowing you to track deals, manage tasks, and identify bottlenecks. Look for features like drag-and-drop functionality, customizable pipelines, and sales forecasting.
- Email Marketing Integration: The ability to integrate with email marketing platforms, allowing you to send targeted email campaigns, track open rates and click-through rates, and nurture leads.
- Task and Activity Management: Features to manage tasks, appointments, and activities related to customer interactions. This includes features like task reminders, calendar integration, and activity logging.
- Reporting and Analytics: The ability to generate reports and analyze data to track key performance indicators (KPIs), identify trends, and make data-driven decisions. Look for customizable dashboards and the ability to export data.
- Mobile Access: The ability to access the CRM from your smartphone or tablet, allowing you to stay connected with customers and manage your business on the go.
- Integrations: The ability to integrate with other software you use, such as email marketing platforms, accounting software, and e-commerce platforms.
- Automation: Features to automate repetitive tasks, such as email follow-ups, appointment scheduling, and lead nurturing.
These are just some of the core features to look for. Depending on your industry and business needs, you may also want to consider features like:
- Customer Service Tools: Help desk integration, live chat, and knowledge base features.
- Social Media Integration: The ability to connect with customers on social media platforms.
- Project Management: Features to manage projects and collaborate with team members.
- E-commerce Integration: Integration with your e-commerce platform to track sales and customer data.
Top Small Business CRM Options to Explore
The market is flooded with CRM solutions, so it’s important to narrow down your options. Here are a few popular CRM platforms well-suited for small businesses, along with brief overviews. Keep in mind that this is not an exhaustive list, and the best choice for you will depend on your specific needs.
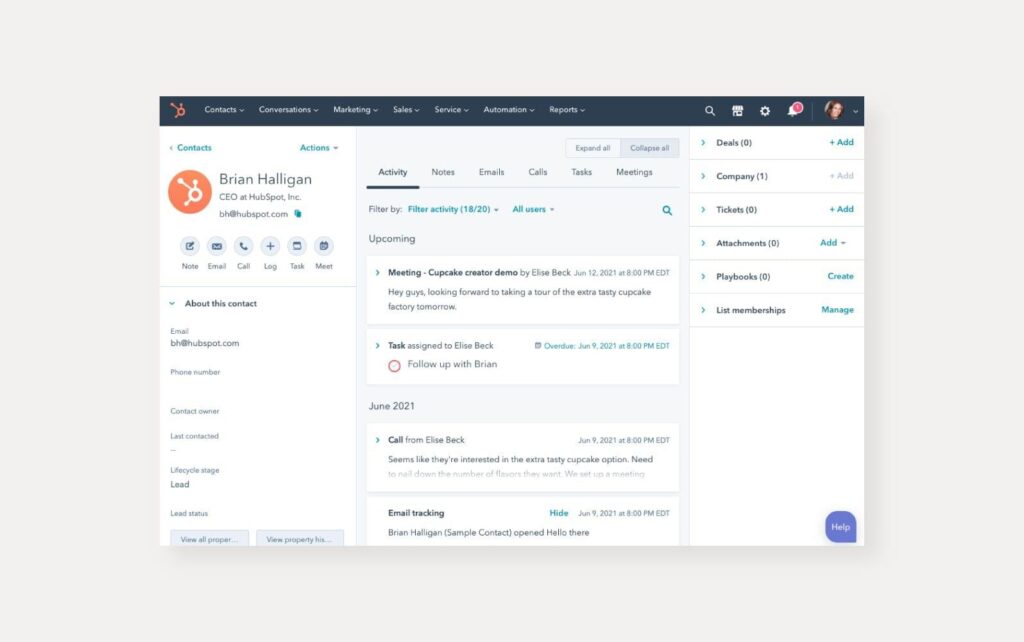
- HubSpot CRM: HubSpot offers a free CRM that’s surprisingly powerful for small businesses. It includes contact management, lead tracking, sales pipeline management, and email marketing integration. It’s known for its user-friendly interface and extensive free features. As your business grows, you can upgrade to paid plans for more advanced features.
- Zoho CRM: Zoho CRM is a versatile and affordable option that offers a wide range of features, including contact management, lead management, sales pipeline management, and marketing automation. It’s known for its customization options and its integration with other Zoho apps.
- Salesforce Sales Cloud: Salesforce is a leading CRM provider, and while it can be pricier, it offers a comprehensive suite of features suitable for businesses of all sizes. Salesforce Essentials is a more affordable version designed for small businesses.
- Pipedrive: Pipedrive is a sales-focused CRM that’s designed to be intuitive and easy to use. It’s particularly well-suited for businesses that want to streamline their sales process and track deals effectively.
- Freshsales: Freshsales (formerly Freshworks CRM) is a cloud-based CRM with a focus on sales and customer support. It offers features like lead scoring, sales pipeline management, and integrated phone and email.
During your CRM demo, be sure to explore these and other options to find the one that best aligns with your business needs.
Making the Most of Your CRM Demo: Tips and Strategies
Once you’ve scheduled your CRM demo, it’s time to prepare for the actual experience. Here are some tips and strategies to help you make the most of the demo and ensure you’re making an informed decision:
- Ask Specific Questions: Don’t be afraid to ask detailed questions about features, integrations, pricing, and support. The more specific your questions, the more helpful the answers will be. Refer to the list of questions you prepared beforehand.
- Focus on Your Pain Points: Identify the areas where your current processes are lacking. Ask the presenter how the CRM can address these specific pain points.
- Request a Customized Demo: If possible, ask the presenter to tailor the demo to your specific business needs. This will allow you to see how the CRM can be used in your unique context.
- Test the User Interface: Pay close attention to the user interface. Is it intuitive and easy to navigate? Can your team members easily learn how to use the system?
- Explore Integrations: Make sure the CRM integrates with the other software you use. Ask the presenter to demonstrate the integrations you need.
- Evaluate the Reporting Capabilities: Ensure the CRM offers the reporting and analytics you need to track your performance and make data-driven decisions.
- Consider the Training and Support: Find out what training and support options are available. Will the provider offer training to help your team get up to speed? What kind of support is available if you encounter problems?
- Involve Key Stakeholders: If other members of your team will be using the CRM, involve them in the demo process. This will help ensure that the chosen CRM meets everyone’s needs.
- Take Detailed Notes: Take detailed notes during the demo, including the features you like, the features you don’t like, and any questions you have.
- Don’t Be Pressured: Don’t feel pressured to make a decision during the demo. Take your time to evaluate the CRM and compare it to other options.
- Ask About Pricing and Contracts: Understand the pricing structure and contract terms before making a decision.
By following these tips, you can ensure that your CRM demo is a productive and informative experience, ultimately leading to a better decision for your business.
Beyond the Demo: Evaluating and Choosing the Right CRM
The CRM demo is just one step in the process of choosing the right CRM for your small business. After the demo, you’ll need to evaluate the different options and make a final decision. Here’s a breakdown of what to consider:
- Compare Features: Compare the features of each CRM and determine which ones best meet your needs. Create a spreadsheet or a table to compare the different features side-by-side.
- Assess Usability: How easy is the CRM to use? Is the user interface intuitive and easy to navigate? Have your team members try out the system to get their feedback.
- Consider Scalability: Will the CRM be able to scale with your business as it grows? Does it offer the features and functionality you’ll need in the future?
- Evaluate Integrations: Does the CRM integrate with the other software you use? Consider the importance of these integrations to your workflow.
- Review Pricing and Contracts: Understand the pricing structure and contract terms. Compare the pricing of different CRM options and choose the one that fits your budget.
- Read Reviews and Case Studies: Read online reviews and case studies to learn about other businesses’ experiences with the CRM.
- Request a Free Trial (If Available): If possible, request a free trial to test out the CRM and see if it’s a good fit for your business.
- Consider Support and Training: What kind of support and training is available? Will the provider offer training to help your team get up to speed?
- Assess Security and Compliance: Ensure the CRM meets your security and compliance requirements.
- Make a Decision and Implement: Once you’ve evaluated all the options, make a decision and implement the CRM.
Choosing the right CRM is a critical decision for any small business. By taking the time to evaluate different options and following these steps, you can ensure that you select a CRM that will help you build stronger customer relationships, improve efficiency, and drive revenue growth.
Conclusion: Transforming Your Business with the Right CRM
Choosing the right CRM is a transformative step for any small business. It’s a commitment to better customer relationships, streamlined operations, and ultimately, greater success. The small business CRM demo is a pivotal part of this journey, allowing you to see the software in action and determine if it aligns with your unique needs.
Remember, the key is preparation. Define your needs, research your options, and come armed with questions. During the demo, be engaged, ask for customization, and don’t hesitate to delve deep into the features that matter most to your business. After the demo, take the time to evaluate your options thoroughly, comparing features, assessing usability, and considering scalability. The right CRM is an investment, and careful consideration is the best way to ensure that investment pays off.
By embracing a CRM, and by carefully selecting the right one through a well-executed demo and a thorough evaluation process, you’ll be well on your way to transforming your customer relationships and building a thriving small business. So, take the leap, explore the possibilities, and prepare to supercharge your customer connections!